Editing STARDIS
Now that you have installed STARDIS and hopefully set up everything you need, you can now get started on your first Pull Request, which is how you edit STARDIS!
Before You Edit
Before you can start contributing to STARDIS, you’ll need to download and install it up on your computer. if you haven’t already, go through the Downloading and Installing STARDIS documentation, and make sure to follow the For Developers section when you do so.
You’ll also need a set up a Github account. Github is a platform that lets you easily access, download, and make edits to online ‘repositories’ (shared projects) using something called ‘Git’. Git is a version control system that allows for developers easily keep prior versions of code, work on features without breaking the main program, and collaborate with others.
Creating a Fork
“Forking” a repository means creating a personal copy of a project so you can make edits to it. Later, these edits can be applied to the original project through a Pull Request, often shortened to “PR”. The instructions here are will guide you through setting up STARDIS, but you can find more general instruction here if you need extra help.
Go to the STARDIS Github page.
click Fork, which should be near the top right of the page.
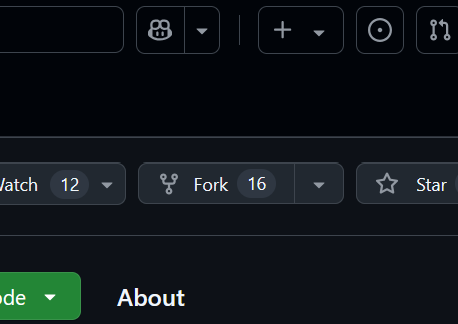
By default, your account should be the Owner of this fork and “Copy the
mainbrach only” should be selected. click ‘Create fork’.
Starting Your Environment
Launch your Command Line terminal, and navigatae to your Stardis direcotry using
cd <path/to/Stardis/directory>.Your
<path/to/Stardis/directory>will be based on where you first downloaded Stardis to. You can find this usingrealpath Stardis.
Start your Stardis Environment by running the command
conda activate Stardis
Branches
One of the main reasons we use Git is because of Git Branches.
Branches are like off-shoots of main code, where you can make changes to
a specific feature or file without immediately worrying about the
broader implications of your changes. The main code is in a branch
called main, and can be referred to as the trunk, because the
other branches come off of it.
Its important to keep in mind that when you want to start working on a new feature or change, make a new branch for that change! This is proper procedure for a variety of reasons, like making it easier to find the source of bugs/error and making the process of adding features smoother.
Make a new Branch with the command:
git branch my_branch_nameChange to your new branch with the command:
git checkout my_branch_nameTo do both at once, use:
git checkout -b my_branch_name
It is good to name your branch after what you are changing in it. For
example, the branch name used to make this documentation was
contribution_docs, so an example from above would look like
git checkout -b contribution_docs. Make sure to change to the
main branch before making a new branch, that way you will have a
fresh start to make your changes.
Lastly, if you need a reminder on what branches you have made, you can
use the command git branch to see a list.
While You Edit
While you are clicking through directories, making changes to your heart’s desire, there are some things to note.
The edits you make will only impact the version on STARDIS on your computer for now, so you don’t have to worry about breaking anything.
After editing a file, make sure to save your changes! Only saved changes will be included in your pull request.
you can use the command
git statusto remind yourself what branch you are on and see what edits/additions you have made. Do this often!
Apply Your Changes
Now that you have made your change, you can finally make a pull request! A pull request is essentially just a suggested change you think should be made to the functional code base of STARDIS. Once accepted, your work will be included in the version of STARDIS that everyone will use.
Don’t be Scared!
You may be worried that your code doesn’t work, your changes don’t make sense, or that for some reason what you did is not good enough. This is not the case, we promise! A pull request can’t break anything. If you did make any mistakes, then a pull request is how you can get suggestions and help. It never hurts to make a pull request, and changes can always be revised and edited, even after the initial request.
If you are still concerned a PR isn’t fully functional, you can always mark a pull request as a draft. To do this, go to the Github website, and find the new PR under either your account or on the STARDIS page. Open the pull request, and on the right side of the screen you should see an option to ‘convert to draft’.
Make a Pull Request
Here are the steps you can take to make your first PR:
Run the command
git add -A. If you only want to push some of your edits, replace-Awith the paths to your edited files.Run the command
git commit -m '<explanation_of_your_pr>'example: git commit -m ‘Typo fix in the quickstart notebook’
Run the command
git push origin <my_branch_name>example: git push origin contribution_docs
By doing this, the change you made will be pushed to your fork of STARDIS under your Github account. Next, you need to go to the original STARDIS repository where you made your clone. There will be a yellow banner asking you to Compare & Pull Request.
You will then need to fill out a form that goes with the PR where you explain your changes. Make sure to be specific in your explanation of the changes, as well as edit the ‘type’ field to indicate what your changes effect.
Revising and Editing your Pull Request
The vast majority of pull requests aren’t perfect on their first iteration, even those from expert programmers! After you make your pull request it will be up to STARDIS reviewers to give it a look over and see what is good and what needs a little polish. Don’t be discouraged by this, its part of the process! On Github you see the comments and suggestions of the STARDIS reviewers, and after some iterations, your code can get ‘merged’, or added to STARDIS!
Here are some things to keep in mind when going to revise and edit your pull requests:
You will need to go back to the branch you made the pull request from to revise it. Go through making changes to this branch just as you did before making the request.
When you want to have your new changes made to your pull request, all you need to do is
add,commit, andpushcommands again jsut as you did earlier. Your new message in yourcommitcommand should elaborate on what you updated, edited, or added to the request.No need to go to Github and Push or Pull any changes. Because you already made the pull request, it will automatically update after you run the new commit command.